AOSP and AAOS Training
Table of Contents
- B01a: Setting up the build machine
-
B01b: Download the source code
-
B01c: Setup AOSP Build Environment
-
B02a: Fix your First Build Issue
-
B02b: Explore Build Commands and Tooling
- B03: Running cuttlefish
-
B04a: ADB and Accessing Logs
-
B04b: Exercise: Build Your First App
- B06a: Exercise: HAL
-
B06b: Exercise: Write Your Own Service
-
B06c: Kernel modules
-
B07a: Inspect the Package Manager
-
B07b: Inspect SELinux Actions During Runtime
-
B08a: Inspect VHAL
-
B08b: Try Monitor App
-
B08c: Exercise: Use Vehicle Properties
-
B10: Exercise: Create your own product
- M: Media/Graphics Exercises
-
Appendix - Working with emulators
B01a: Setting up the build machine
For the AOSP and AAOS training there are two options:
- Either use a provided cloud instances, then continue on the subpage cloud
- or use a local linux machines, e.g. a Laptop or workstation, then continue on the subpage local.
Additional notes
General information for the build requirements can be found on the website Try Android development. We already bundled these requirements in the Dockerfile and installed them on the cloud server.
Using a provided cloud instance
We are providing 12 cloud environments (VMs/virtual machines) for the training at hand. The machine configuration is
- 24 VCPUs
- 128 GB RAM
- 500 GB disk storage
running Ubuntu 24.04.
These VMs have already been provisioned with an AOSP source tree based on Android 15 and the source code has already been built for the target “aosp_cf_x86_64_auto-trunk_staging-userdebug”. Furthermore, the cuttlefish emulator has been installed.
Note
To use the cloud instances you need an SSH client. On a modern Windows installation, the OpenSSH client is available as part of the operating system. If that is not the case, please click the above link for further instructions. We do not recommend using Putty, because we will need to forward many network ports later on. We provide an OpenSSH client configuration file that accomplishes that.
Coordinate the IP Address assignment with the trainers. Each participant will receive a slip of paper with a unique IP address of a cloud instance. You will also receive a password. Sharing an AOSP build tree will not work.
Note
The VMs will be decommissioned once the training is over. Therefore, feel free to customize them to suit your needs.
Note
The necessary tools like repo and the required configuration, such as the one for git, has already been performed on the server.
Using VS Code with the VM (recommended)
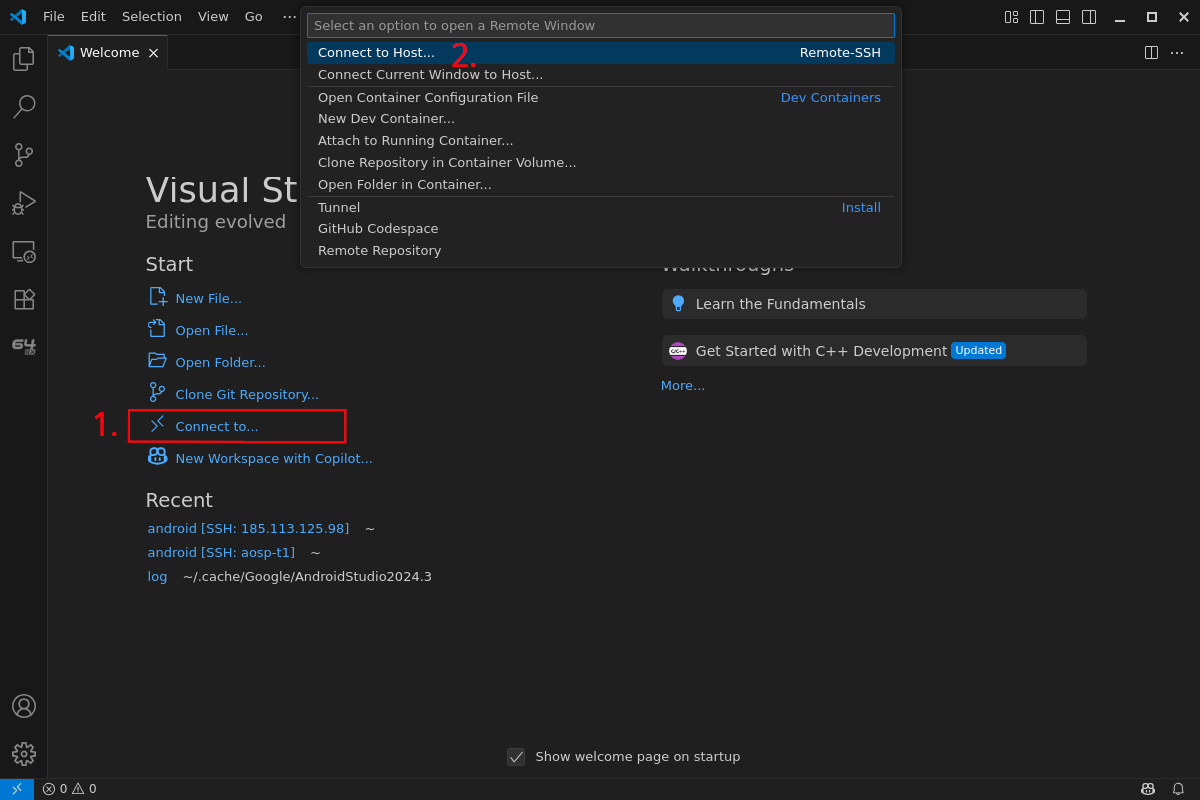
To use the cloud instance, connect to it as a Remote in Visual Studio Code. First, ensure the Remote - SSH (ms-vscode-remote.remote-ssh) extension is installed.
Then, select "Connect to..." (1.) on the Welcome tab, then select "Connect to Host..." (2.) from the options at the top of the window.
Enter ubuntu@<your-ip-address>, replacing <your-ip-address> with the IP address of the VM assigned to you. You will then be prompted for the password, enter the password from the piece of paper.
VS Code will then automatically install the remote tools on the VM and open a window connected to the Remote. It will show in the lower left corner that it is now connected to the Remote ("SSH: 185.113.125.xxx"). In this window, you can now select "Open Folder..." (1.) from the Welcome tab and then select the "android" folder from the list at the top of the window (2.). You should then click "OK" (3.).

After loading the android folder, VS Code will ask if you want to install the recommended extensions for this repository. Select "Install" to install the recommended extensions.
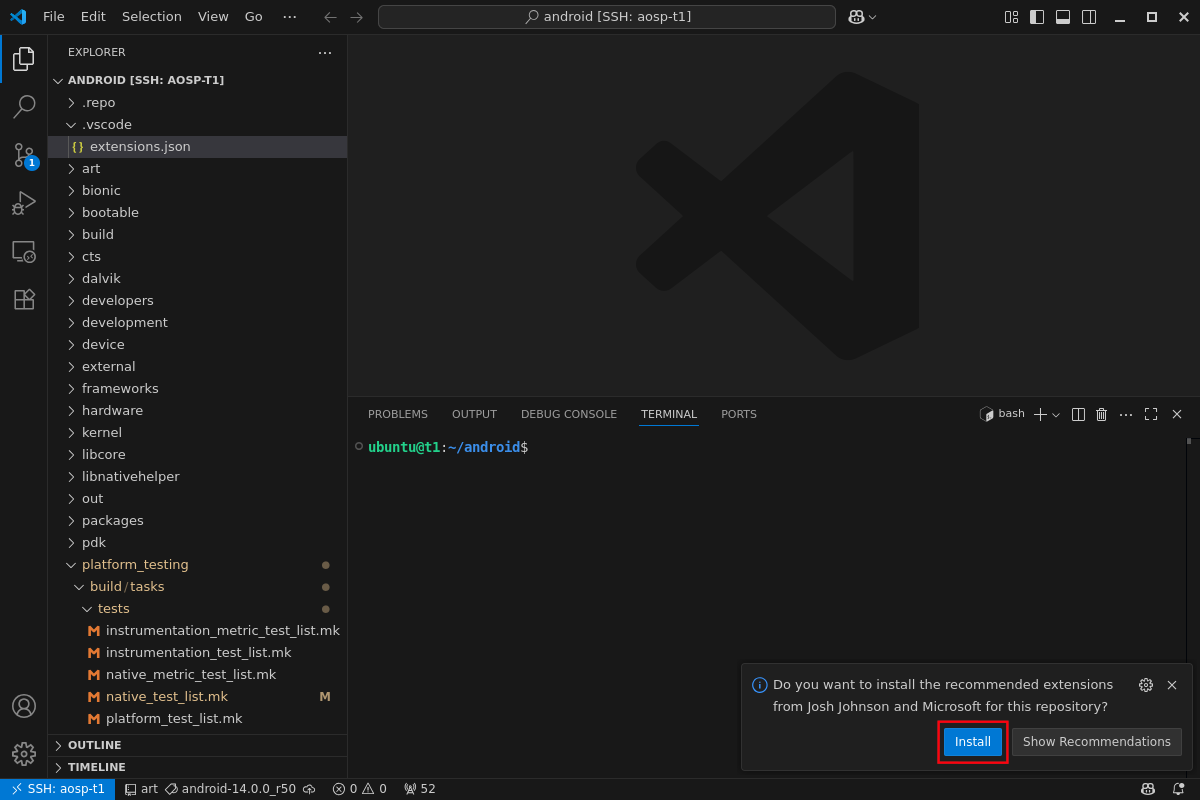
VS Code is now set up for the android workspace on the VM. You can use the VS Code Explorer to navigate the files in the android source tree and open files for viewing and editing.
The terminal window at the bottom can be used to execute commands on the VM, which you will need to do during this training. If you need multiple terminals, you can add additional terminal tabs by clicking the "+" icon on the top of the terminal pane.
Working without VS Code
Configure your SSH client to connect to the IP address using the username ubuntu. SSH is configured to use the default port 22. A Linux shell example is
ssh ubuntu@185.113.125.XXXAfter you connect successfully, execute a ls command and look at the files in the home folder.
Terminal multiplexing
To have multiple shells in a single SSH session, you can use screen or tmux. Both are already installed.
Tips & Tricks
ssh public key
To avoid retyping the password on every login, you can also add one of your personal public ssh keys to the server. We will delete the virtual machine after the training.
(Public) IP Address
You can find the IPv4 address of this server in the file ip_address.txt. Use cat to display the file contents:
cat ip_address.txt
Using a local linux machine
Info
This step is only relevant if you are not using the remote server but a local build environment (your own one or the one provided by inovex on SSDs).
For this training we provide a Dockerfile that installs the necessary tools and packages.
The Dockerfile can be found in the github repository for this training.
# Build the container
docker build -t aosp .

# Run it and change into the interactive environment with:
docker run --rm -it --user=ubuntu aosp
Tip
You can also use podman instead of docker, just replace docker ... commands with podman ....
For the podman run command, you need to add an additional option --userns=keep-id. This assigns the local user's uid to the user inside the container, and allows that user to access /src/aosp from inside the container.
Setup git
In case you have not done so already, set up git with your personal information:
git config --global user.mail your_mailaddress@example.com
git config --global user.name "Your Name"
Install repo
To download the Android source code, you must install the command repo first. It's a tool developed by Google to maintain the Android source tree.
export REPO=$(mktemp /tmp/repo.XXXXXXXXX)
curl -o ${REPO} https://storage.googleapis.com/git-repo-downloads/repo
gpg --recv-keys 8BB9AD793E8E6153AF0F9A4416530D5E920F5C65
curl -s https://storage.googleapis.com/git-repo-downloads/repo.asc | gpg --verify - ${REPO} && install -m 755 ${REPO} ~/bin/repo
This will install the repo command into your home directory in the folder ~/bin/`. You may also have to add this path to your ``PATH environment variable.
Info
We also already installed repo in the docker container if you don't want to install it in your system.
B01b: Download the source code
Download Source Code
Info
Execute the commands only if are are not using a cloud instance and not using a prepared SSD. We have already downloaded and build the source code once for you. Execute these only if you are really want to start from scratch.
Create a directory for the code and development environment. In this tutorial, we will simply call this directory android.
# Create a new directory and use it as root of your build environment
mkdir android
cd android
Warning
Downloading takes quite a while and consumes > 200GB of storage capacity.
From this point on, all other commands should be executed from within your sources directory, unless stated otherwise.
# Initialize the repository
repo init --partial-clone -b android-automotiveos-15.0.0_lts4 -u https://android.googlesource.com/platform/manifest

# Actually download the source tree
repo sync -c -j8
B01c: Setup AOSP Build Environment
Info
You will have to re-run the following command each time you leave your build environment, e.g. by closing/changing your shell or restarting your system.
Ensure you are in the ~/android directory, then run the following commands:
source build/envsetup.sh

# Always run *lunch* afterwards! See next step!
In case you encounter the following error, please ignore it:
Build sandboxing disabled due to nsjail error.
Try out Repo Commands
The AOSP source tree is managed by a python tool called repo that utilizes git to manage and download a huge number of git repositories. repo also helps to automate parts of the development workflow.
Repo has several sub commands. Here's a selection of commands to try. You can look up their description using repo help:
cd android

repo status

repo diff

repo forall -c git remote -v

repo help
Warning
If you use the cloud instances, repo might notify you about a newer version being available upstream. Please do not upgrade because this training has only been tested with the currently installed version.
Choose the Target Device
To list all build targets (aka. lunch targets) you can execute
lunch
Since Android 14 this will print an empty list by default because some internal cache has not been generated yet. Please execute
# Available releases are: ap2a next staging trunk trunk_food trunk_staging.
export TARGET_RELEASE=trunk_staging
build_build_var_cache
And then lunch again. Now you should see a very long list of targets.
To select a lunch target at once, without selecting it by typing the number on the console, execute
lunch aosp_cf_x86_64_auto-trunk_staging-userdebug
Here we use the lunch target aosp_cf_x86_64_auto-trunk_staging-userdebug. cf_x86_64_auto is the AAOS Virtualization reference design based on cuttlefish.
userdebug is the build variant. See the documenation Choose a target for more information about it.
B02a: Fix your First Build Issue
Try to Build the Source Code
Navigate to the ~/android directory. This task assumes you're in the same shell environment you have configured in B01c: Setup AOSP Build Environment.
Now start building the source with
m -j24
Don't worry about the argument -j24 for now. It will be explained in a later exercise.
Under normal circumstances, this command would take several hours to complete. However, for the source code release *_lts4 and the selected build target aosp_cf_x86_64_auto it quickly fails with an error.
The error you should see is:
platform_testing/build/tasks/tests/native_test_list.mk: error: continuous_native_tests: Unknown installed file for module 'sv_2d_session_tests'
platform_testing/build/tasks/tests/native_test_list.mk: error: continuous_native_tests: Unknown installed file for module 'sv_3d_session_tests'
In file included from build/make/core/main.mk:1469:
In file included from build/make/core/Makefile:7667:
In file included from platform_testing/build/tasks/continuous_native_tests.mk:27:
build/make/core/tasks/tools/package-modules.mk:93: error: done.
18:01:37 ckati failed with: exit status 1

#### failed to build some targets (01:10 (mm:ss)) ####
That is bad. The source code does not built. But it’s often the case for large projects, like the AOSP, that some build configurations are broken.
The next sections walk you trough the process of debugging and fixing this build issue.
Note
The next sections will guide you through the exercise and provide the solutions, too. Don't just read passively. Instead, try to perform the steps on the command line yourself and invest the effort of solving the issue at hand!
Selecting a Search Term
Find a string or symbol name to search for. In our case you may use name of the failing modules, e.g., sv_2d_session_tests and sv_3d_session_tests.
Using this search term you can find the right place in the source code and learn more about it.
Let's go with sv_2d_session_tests for now.
Searching the AOSP Code Base
There are some special grepping tools in the AOSP environment. Here just use mgrep to search in Android.mk and Android.bp files. It will be explained in more detail later.
When you type in the command mgrep sv_2d_session_tests, you get the output:
./platform_testing/build/tasks/tests/native_test_list.mk:240: sv_2d_session_tests \
There is only one result for the search term sv_2d_session_tests. The match is found in one file in a subdirectory of platform_testing.
When you look into the file
platform_testing/build/tasks/tests/native_test_list.mk
you see that two modules, sv_2d_session_tests and sv_3d_session_tests are added to native-tests, a variable that combines a lot of targets that are built together.
Also, you can see that this line is the only line/file that contains the string sv_2d_session_tests. There is no Android.bp file that is defining the module, e.g. adding some C/C++ sources to build something.
This is strange. Where is the source code of that sv_2d_session_tests tests?
Tip
See also some other tips in the blog post AOSP: Advanced Development Tricks under the topic “grep faster”.
Search Online on cs.android.com
Let’s search the entire AOSP tree and all versions on cs.android.com for the string sv_2d_session_tests:
Warning
There's currently a known and reported issue with cs.android.com.
The search won't show any results.
The code is still there. Use the direct links below.
There is only a single file where the string is found. See https://cs.android.com/android/platform/superproject/+/android14-qpr3-release:platform_testing/build/tasks/tests/native_test_list.mk?q=sv_2d_session_tests&ss=android
This is super strange. There is no source code for that module sv_2d_session_tests. It seems that it’s a tool that was not released as open source by Google. It’s used in the AOSP source code internally at Google, but wasn't published.
When you do a git blame, on the line for sv_2d_session_tests, you will find the commit b6975bd
It just adds the two lines sv_2d_session_tests and sv_3d_session_tests.
The Fix
Since there is no released source code for these two build modules and it exists only for testing, it is most likely safe to just remove the whole lines. These modules were removed a couple of releases ago. We just sneakily added them back in to give you a problem to work on.
At the moment th output of repo diff should look similar to this:
project platform_testing/
diff --git a/build/tasks/tests/native_test_list.mk b/build/tasks/tests/native_test_list.mk
index bf671731f..64e1e9584 100644
--- a/build/tasks/tests/native_test_list.mk
+++ b/build/tasks/tests/native_test_list.mk
@@ -236,7 +236,9 @@ native_tests := \
 ifeq ($(BOARD_IS_AUTOMOTIVE), true)
 native_tests += \
     libwatchdog_test \
-    evsmanagerd_test
+    evsmanagerd_test \
+    sv_2d_session_tests \
+    sv_3d_session_tests
 endif

ifneq ($(strip $(BOARD_PERFSETUP_SCRIPT)),)
You can now either edit and remove these two lines by hand using your favorite editor:
nano platform_testing/build/tasks/tests/native_test_list.mk
Or enter the platform_testing folder, and run git reset --hard which will revert to a working setup.
The output of repo diff should now be empty.
Testing the Fix
To test if the fix is sufficient, continue compiling the AOSP source code. E.g.
m -j24
Since your tree has not been built before, the above command will take a while to complete.
When the built has finished successfully, the following output will be shown:
#### build completed successfully (XX seconds) ####
Great. The fix was sufficient and the build is successful.
Note
The build does not need a lot of time to exit successfully. We have pre-built it to speed up the exercise.
B02b: Explore Build Commands and Tooling
Build an Image for our Target Device
If you are using a build environment already prepared by the trainers (VM, external SSD drive), the following command will unexpectedly complete very quickly. We have done the heavy lifting for you already 🙂.
# After 'source/envsetup.sh' and 'lunch'!
m -j$(nproc)
Note
On many POSIX-compatible systems, the nproc command prints the number of currently online processors. In case you are using one of our provided cloud instances, the nproc command will return 24, since the virtual machines have 24 cores. E.g., you can also just use
m -j24
Explore Build Commands, Options and Tooling
Useful commands for building parts of Android include:
# Trigger a full build for a target, starting at the top of the tree:
m
make     # make only works from the top of tree!

# Build and install all modules from the current directory as well as their dependencies:
mm
mma

# Build and install all of the modules in the supplied directories as well as their dependencies:
mmm dir1, dir2, ..
mmma dir1, dir2, ..
The m command also offers ways to clean up an already existing out directory. Make sure to read the following commands and understand their consequences, before entering them on your development machine:
# Clean the out/target/product/<productname>/*.img files.
m installclean
# Important:
#   After 'm installclean', the cuttlefish virtual device will not work anymore,
#   because its bootable image has just been deleted. You will need to re-generate
#   the deleted files by using 'm'.

# Clean build artifacts
# DO NOT EXECUTE THESE NOW, a clean build needs several hours to complete!
# m clean
# m clobber
More detailed help output and an explanation of the different command line tools and arguments can be obtained as follows:
# Help for tools and commands like lunch, mm, Android-specific grep tools, etc.:
hmm

# Help for build targets like clean, sync, snod:
m help
A selection of tools you might find useful:
# Go back to top of tree
croot

# Specific grep variants
cgrep        # C/C++
ggrep        # Gradle
gogrep       # Go
jgrep        # Java
jsongrep     # JSON
ktgrep       # Kotlin
mangrep      # AndroidManifest.xml
mgrep        # Makefiles and *.bp
owngrep      # OWNERS
rsgrep       # Rust
sepgrep      # sepolicy
sgrep        # Source files
tomlgrep     # TOML
pygrep       # Python

# more?
Build a Software Bill of Materials (SBoM) and Explore the out Directory
m sbom

# Output
ls out/<dist>/sbom*

# If you've used the aosp_cf_x86_64 target from above, replace <dist> accordingly:
ls out/soong/sbom/aosp_cf_x86_64_auto/sbom*
B03: Running cuttlefish
Running the device, cuttlefish emulator, is different wether you are working on one of the cloud instances or locally. Please continue either
Using one of the Provided Cloud Instances
ssh config
You have to configure 51 port forwarding configurations in your SSH config to connect to cuttlefish's web-based UI.
You need to forward port 8443 and the port range 15550–15599 from your localhost to the VM. We have provided an example configuration for the OpenSSH SSH client.
Copy the following ssh config file into our ~/.ssh/config configuration (%USERPROFILE%\.ssh\config for Windows) or use a separate file with ssh -F:
# Forward https and webrtc ports for cuttlefish in the cloud.
Match host="185.113.125.*"
    user ubuntu
    #LocalForward 5038 localhost:5037 # for adb
    LocalForward 8443 localhost:8443
    LocalForward 15550 localhost:15550
    LocalForward 15551 localhost:15551
    LocalForward 15552 localhost:15552
    LocalForward 15553 localhost:15553
    LocalForward 15554 localhost:15554
    LocalForward 15555 localhost:15555
    LocalForward 15556 localhost:15556
    LocalForward 15557 localhost:15557
    LocalForward 15558 localhost:15558
    LocalForward 15559 localhost:15559
    LocalForward 15560 localhost:15560
    LocalForward 15561 localhost:15561
    LocalForward 15562 localhost:15562
    LocalForward 15563 localhost:15563
    LocalForward 15564 localhost:15564
    LocalForward 15565 localhost:15565
    LocalForward 15566 localhost:15566
    LocalForward 15567 localhost:15567
    LocalForward 15568 localhost:15568
    LocalForward 15569 localhost:15569
    LocalForward 15570 localhost:15570
    LocalForward 15571 localhost:15571
    LocalForward 15572 localhost:15572
    LocalForward 15573 localhost:15573
    LocalForward 15574 localhost:15574
    LocalForward 15575 localhost:15575
    LocalForward 15576 localhost:15576
    LocalForward 15577 localhost:15577
    LocalForward 15578 localhost:15578
    LocalForward 15579 localhost:15579
    LocalForward 15580 localhost:15580
    LocalForward 15581 localhost:15581
    LocalForward 15582 localhost:15582
    LocalForward 15583 localhost:15583
    LocalForward 15584 localhost:15584
    LocalForward 15585 localhost:15585
    LocalForward 15586 localhost:15586
    LocalForward 15587 localhost:15587
    LocalForward 15588 localhost:15588
    LocalForward 15589 localhost:15589
    LocalForward 15590 localhost:15590
    LocalForward 15591 localhost:15591
    LocalForward 15592 localhost:15592
    LocalForward 15593 localhost:15593
    LocalForward 15594 localhost:15594
    LocalForward 15595 localhost:15595
    LocalForward 15596 localhost:15596
    LocalForward 15597 localhost:15597
    LocalForward 15598 localhost:15598
    LocalForward 15599 localhost:15599
After you added these port forward configurations into your local SSH config, you have to restart your SSH session.
Start the cuttlefish emulator
Tip
Remember to change to the android directory and to run . build/envsetup.sh and lunch aosp_cf_x86_64_auto-trunk_staging-userdebug if you are using a fresh SSH session.
Start the cuttlefish emulator with
launch_cvd --gpu_mode=guest_swiftshader \
    --start_webrtc=true \
    -report_anonymous_usage_stats=n \
    --enable-sandbox=false \
    --cpus=8 \
    --display0=width=1920,height=1080,dpi=140
This will start the emulator and boot the OS.
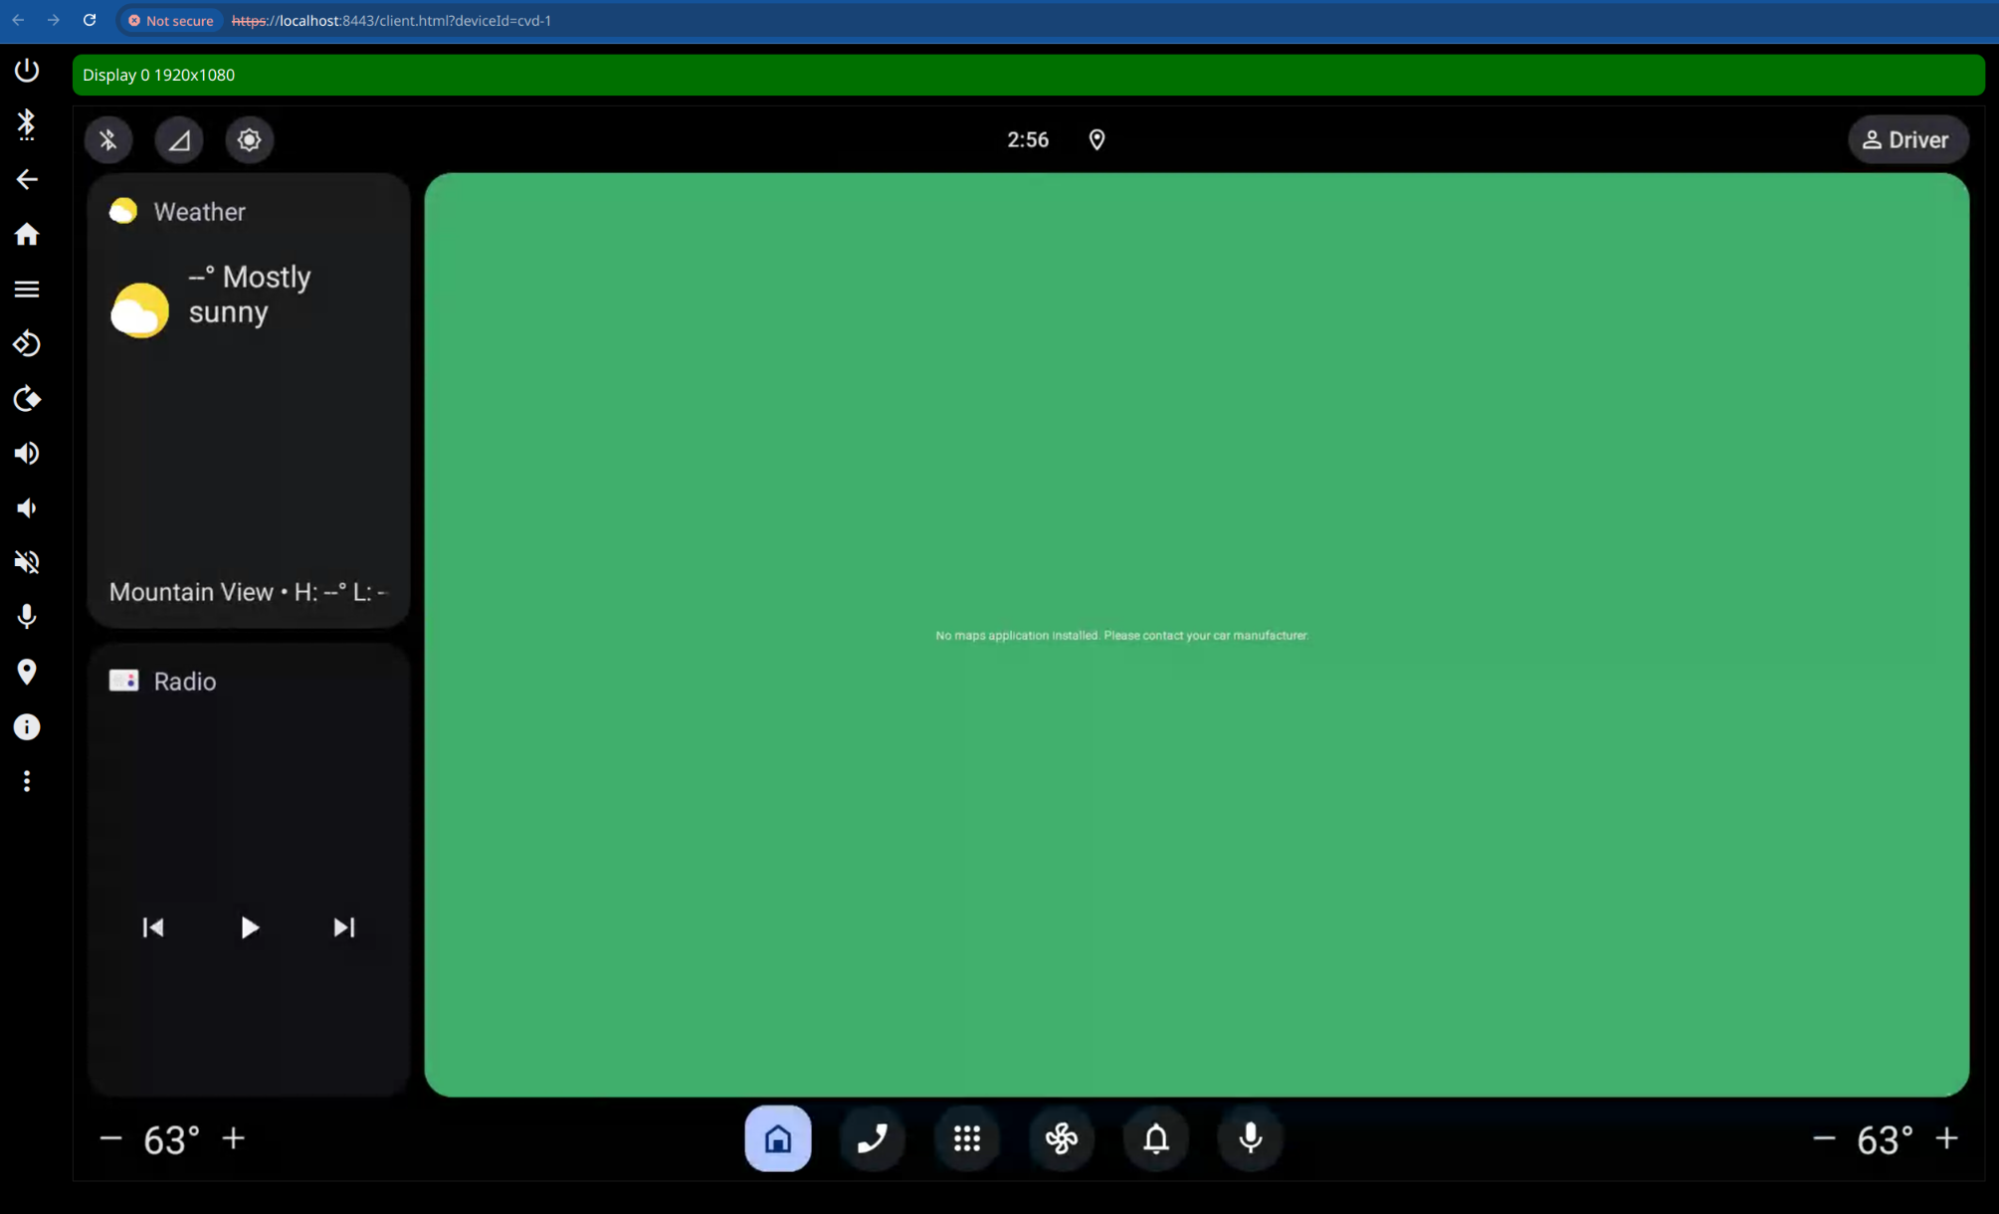
Now, open a Chromium-based browser, e.g., Chrome, and go to the locally-hosted website https://localhost:8443. You should see the web UI of the cuttlefish emulator.
Note
You cannot use Firefox for the web UI of the emulator. The WebRTC connection will not work.
Note
When you start a second SSH connection to the VM, you may see the following errors:
bind [127.0.0.1]:15599: Address already in use
channel_setup_fwd_listener_tcpip: cannot listen to port: 15599
Could not request local forwarding.
on the console. These can be ignored. They just indicate that the second SSH connection cannot set up the port-forward configurations, because the ports are already used by the first SSH connection.
Using a Local Linux Machine
Execute the following commands to run Cuttlefish on your machine:
launch_cvd --gpu_mode=guest_swiftshader \
    --start_webrtc=true \
    -report_anonymous_usage_stats=n \
    --enable-sandbox=false \
    --cpus=8 \
    --display0=width=1920,height=1080,dpi=140


adb devices

# Browser
https://localhost:8443/
Cuttlefish in Docker
It is possible to run Cuttlefish virtual devices inside of a docker container (e.g., the one provided for the training) under certain preconditions. For instance, your host machine needs to be running a Linux distribution with KVM installed and usable.
Info
The following command intentionally removes some of the container isolation between software running inside the container and the host’s kernel. As different (versions of) Linux distributions have different security features enabled or your machine might be subject to security hardening measures, your mileage may vary.
The adb commands and the --publish=127.0.0.1:5037:5037 parameter for Docker in the code block below are optional. These allow you to use adb from outside of the container to interact with Cuttlefish inside the container.
docker run --rm -ti -v ./android:/src/aosp  --user=ubuntu -w /src/aosp \
    --device /dev/kvm                                                             \
    --device /dev/vhost-vsock                                                     \
    --publish=127.0.0.1:8443:8443                                                 \
    --publish=127.0.0.1:5037:5037                                                 \
    --privileged                                                                  \
    --ulimit nofile=262144:262144                                                 \
    aosp
adb kill-server              # make sure no server is running
adb -a -P 5037 start-server  # restart listening on all interfaces

launch_cvd --gpu_mode=guest_swiftshader \
    --start_webrtc=true \
    -report_anonymous_usage_stats=n \
    --enable-sandbox=false \
    --cpus=8 \
    --display0=width=1920,height=1080,dpi=140
Tip
In case adb devices shows no devices connected even though the adb commands were run and the Cuttlefish virtual device is running, using adb connect localhost:6520 may help.
Tip
When using podman instead of docker, remember to add the --userns=keep-id option so that the /src/aosp files are readable by the user inside of the container.
B04a: ADB and Accessing Logs
adb (the Android Debug Bridge) is the tool for interacting with an Android device. It provides numerous helpful commands. The most important ones are listed below:
# List available devices:
adb devices

# Access a local device' shell:
adb shell

# Connect to a remote device:
adb connect <HOST>[:PORT]
adb disconnect [HOST[:PORT]]

# Push & Pull -> Copy files:
adb push [--sync] [-z <ALGORITHM>] [-Z] <LOCAL...> <REMOTE>
adb pull [-a] [-z <ALGORITHM>] [-Z] <REMOTE...> <LOCAL>

# Sync a local build from $ANDROID_PRODUCT_OUT to the device (default all):
adb sync
# Sync only a single partition, e.g., /system
adb sync <PARTITION>
# Throw in some -l if you're curious what _would_ actually be transfered (dry-run)
adb sync -l [<PARTITION>]

# App installation
adb install app.apk

# Bug report
# https://developer.android.com/studio/debug/bug-report
adb bugreport report.zip

# More
adb help
Accessing Logs
# Access logs:
adb logcat

# Dump the current state of the log but do not continue to follow it:
adb logcat -d

adb logcat --help

# Inspect individual logcat buffers
# See also https://developer.android.google.cn/tools/logcat?hl=en
adb logcat -b radio
adb logcat -b main
adb logcat -b all
Logcat alternatives:
Getting kernel log messages:
# root-enabled device ('su' may help as well):
adb shell
$ dmesg
Development workflow, e.g., for Pixel devices, the boot loader needs to be unlocked
source build/envsetup.sh
lunch <option>
m -j$(nproc)
adb reboot bootloader
fastboot flashall
Hot Syncing
Syncing a source tree with a running (virtual) device can be done easily using sync commands but requires some preliminary steps, including disabling verified boot features and making the target partitions writable.
# Prepare
adb root
adb disable-verity
adb reboot
adb root
adb remount

# Afterwards
m sync

adb sync

adb shell "stop && start"
Debugging Services
Dumpsys
adb shell dumpsys -l

adb shell dumpsys

# For additional parameters for specific services see
adb shell dumpsys <servicename> help

# Car Services
adb shell dumpsys car_service

adb shell dumpsys car_service --list
adb shell dumpsys car_service --services [service-name]

# Your own services
adb shell dumpsys activity service com.example.yourapp
cmd
A command line interface for several system services. Not all services provide such an interface. Examples:
adb shell cmd -l                                    # lists all available services
adb shell cmd wifi connect-network VirtWifi open    # connects to SSID VirtWifi with no security
adb shell cmd car_service garage-mode on            # Puts car into garage mode
adb shell cmd window                                # lists all commands of the window manager
am, pm, ...
The Activity Manager am
adb shell am            # print all options and the help text
adb shell cmd activity  # same as adb shell am
adb shell am force-stop <PACKAGE>
adb shell am stop-service <INTENT>
adb shell am start-service <INTENT>
The Package Manager pm
adb shell pm                 # print help & all options
adb shell cmd package        # same as adb shell pm
adb shell pm list packages   # list all installed apps
adb shell pm uninstall       # uninstall an app
adb shell pm grant           # grant a runtime permission
fastboot
Apart from adb there is also the fastboot tool in the Android platform tools. We do not cover it in this training, but it's nevertheless important. It's the tool to flash the initial partition images onto the device or for recovering a bricked device. See Flash with Fastboot for more information.
B04b: Exercise: Build Your First App
In this exercise you are going to build and deploy our first app.
Download and Build
Download the git repository of the training to your local computer:
git clone https://github.com/inovexAcademy/aosp-aaos-training
The Android application is in the sub-directory app.
Now start Android Studio and open the project in app. Downloading the necessary dependencies and indexing the project may take some time.
After that you should see the following screen:
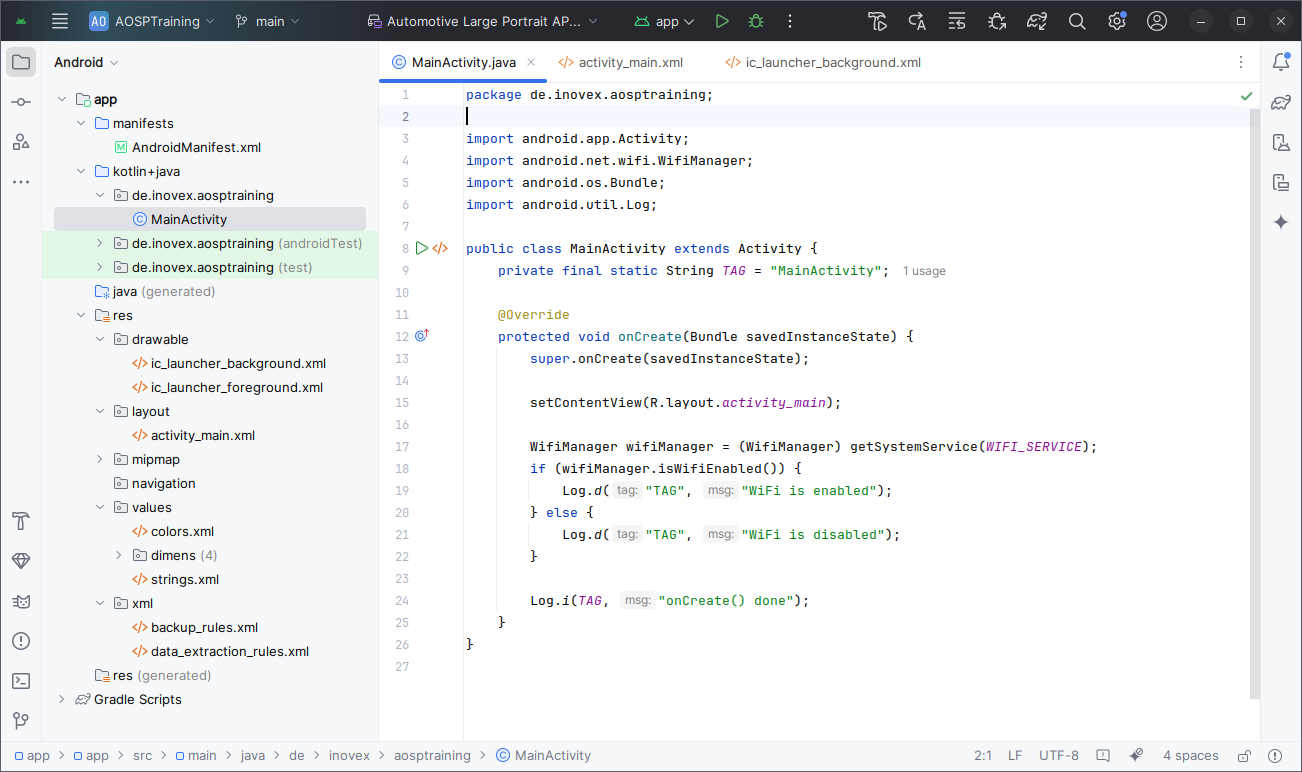
Let the instructor show you the core elements of the UI:
- Editor Window
- Toolbar to build and run the Application
- Sidebar to navigate the source files
- Bottom window with logcat
Now just build the application to get the apk file. Once the build has finished you will find the file in the build directory
find -name "*.apk"
There are multiple files, but the final apk will be ./app/app/build/outputs/apk/debug/app-debug.apk.
Install and Run
In case your Android device is attached locally, e.g., a phone in Developer Mode, you can deploy directly from the Android Studio UI.
When using the cuttlefish device in the virtual machine, as in this training, that is not possible. Therefore, we will install the application by hand.
First, copy the apk to virtual machine
scp ./app/app/build/outputs/apk/debug/app-debug.apk ubuntu@185.113.125.XXX:
Now switch back to a shell on the virtual machine. First check that the (cuttlefish) device is running:
adb devices
Then install the application in the apk file with
adb install app-debug.apk
This loads the apk file in the current directory and installs it on the device. You can check whether the application has been installed successfully with
adb shell pm list packages | grep aosptraining
adb shell pm dump de.inovex.aosptraining | less
The first command just prints a list of installed packages. The second command instructs the PackageManager to print out all the information of an application.
Then switch to the UI of the device and search for the new Launcher Activity/Icon on the Home screen. Click on it to start the application. The application should start.
To see the logcat output of the Activity, you can do
adb shell logcat -s 'MainActivity:*'
To see the logcat output of the entire application, you can use external tools like alogview:
alogview de.inovex.aosptraining
Additional Command-Line Tools
You can also control applications on the command line. For example, to stop an application, remove all Activity, Services and kill the Unix process, you can use
adb shell am force-stop de.inovex.aosptraining
After executing this command, the Activity on cuttlefish should disappear.
To start an Activity on the command line, you can execute
adb shell am start -n de.inovex.aosptraining/.MainActivity
am is the command-line interface to the ActivityManager. The first part (de.inovex.aosptraining) is the package name. The second part (.MainActivity) the name of the Activity.
After executing the command, you should see the Activity reappearing on the UI.
Bonus Task
Add a new log statement, e.g.,
Log.i(TAG, "hello world!");
in the onCreate() function, rebuild, redeploy and see it logcat's output.
B06a: Exercise: HAL
Go to the topic assigned to your group to access the resources for you topic.
Group 1: Generic Kernel Image (GKI)
Resources
Look at the following resources to get started. Hint: Follow links and also look at releated sections in the documentation hierarchy.
Questions
- Why did Google introduce the GKI?
- Where is the GKI used?
- Are device vendors still allowed to use custom kernels?
Group 2: Project Treble
Resources
Look at the following resources to get started. Hint: Follow links and also look at releated sections in the documentation hierarchy.
Questions
- What is Project Treble?
- What was the motivation for Project Treble?
- What further changes were made after the initial implementation in Android 8?
Group 3: Generic System Image (GSI) and Shared System Image (SSI)
Resources
Look at the following resources to get started. Hint: Follow links and also look at releated sections in the documentation hierarchy.
Questions
- Where is the GSI used?
- Who benefits from SSI?
- What is the point of AOSP having so many partitions (system, system_ext, product, vendor, odm)?
B06b: Exercise: Write Your Own Service
In this exercise, you will create and launch your own service on the (virtual) device and interact with it.
The required code to get you started can be found in the Github repository accompanying this training.
The instructions and individual tasks of the assignment can be found in the README.md in the hands-on_native-service/ folder.
B06c: Kernel modules
In this exercise, we will build our own kernel module for the kernel running on the CVD, and integrate that module into the AOSP build process.
We will be working with the cuttlefish emulator device again in this exercise. When working with the kernel and kernel builds, it is important to first understand what kernel we are working with before actually modifying anything.
Inspect the Cuttlefish kernel
Start a new session on the training VM and read the output of the lunch command carefully and note down the TARGET_ARCH value.
Open an adb shell and try to figure out what kernel is running (cf. uname(1)). There are multiple ways to do this.
Take note of the kernel name, then use the Documentation to parse the kernel version string.
Find the kernel in the AOSP source tree. Start with the kernel sub directory in the root directory. Use the information you have collected in the previous steps.
Take a look at the following resources for more information about the running kernel:
Tip
Upstream trims these pages down from time to time, so in case you cannot find the exact kernel version on the respective sub pages for the kernel version in use, just try the next link.
Tip
This page contains information on the build variant you will be using in the next steps.
Build a kernel module
In this step, coding is not required. Simply build the kernel module "as is" from the branch mentioned in the instructions below.
A kernel build environment has been prepared for you on the training VMs in the kernel-gki-android15-6.6 directory.
For reference, the steps to create this environment are as follows:
KERNEL_BUILD_DIR=${HOME}/kernel-gki-android15-6.6
mkdir -p "${KERNEL_BUILD_DIR}"
cd "${KERNEL_BUILD_DIR}"
repo init -u https://android.googlesource.com/kernel/manifest -c -b common-android15-6.6
repo sync -c -j6
# Check out the kernel sources matching the kernel running in cvd
git -c common checkout 02f25b80c91cf5abf216b99ded16570c8cc87dd4
Enter the kernel build directory in a fresh shell session on the training VM. Do not run lunch or build/envsetup.sh in this session.
cd kernel-gki-android15-6.6
The kernel build environment contains the kleaf and bazel wrappers. To use these in the following steps, add them to your $PATH environment variable:
KERNEL_BUILD_DIR=${HOME}/kernel-gki-android15-6.6
export PATH="${KERNEL_BUILD_DIR}/tools:${PATH}"
Info
You will have to do this every time you open a new shell. In a more persistent setup, you would either set the $PATH variable in your shell configuration files or install bazel with your operating system's package manager.
For this training exercise, that kind of overhead is not required.
Before we can build the kernel, we need to identify the bazel build target (similar to a make target). bazel has a query feature that allows listing kernels. The target notation syntax might seem odd at first: it is not 100% accurate to think of the part between "//" and ":" as a directory path relative to the project root "//" but this simplification helps a lot in understanding what is going on. Check out the respective directories in the kernel source tree when running the query commands below. There are a lot of build files used to configure the individual variants:
# Get help regarding the target syntax:
bazel help target-syntax

# List all common kernel targets
bazel query "kind('py_binary', //common:*)"

# List all virtual device targets
bazel query "kind('py_binary', //common-modules/virtual-device:*)"
Now, let's finally build some kernels!
bazel build //common:kernel_x86_64
Integrate our kernel modules into the source tree
With Android 15, we use in-tree builds:
git clone https://github.com/inovexAcademy/aosp-aaos-training.git vendor/inovex
Read and understand the BUILD.bazel file in ${KERNEL_BUILD_DIR}/vendor/inovex/kernel-module.
Build the kernel module:
bazel build //vendor/inovex/kernel-module:all
After having completed the above steps successfully, you will find your kernel module files in ${KERNEL_BUILD_DIR}/bazel-bin/vendor/inovex/kernel-module/. There are multiple sub-directories, per target and per build type/mode.
In the following steps we will be using the *.ko files found in the main directories. You can inspect them using the following commands:
ls -lh  bazel-bin/vendor/inovex/kernel-module/training_mod/*.ko
modinfo bazel-bin/vendor/inovex/kernel-module/training_mod/*.ko
Deploy a kernel module
Manually deploy kernel module
In order to quickly test your kernel module, push it onto the running Cuttlefish device and load it. This approach is insufficient for building an actual product, however, it is very useful for quick development iterations.
# We need root privileges to load kernel modules. Do this first:
adb root

# Push the module:
adb push bazel-bin/vendor/inovex/kernel-module/training_mod/aosp_training_sysfs.ko /tmp/

# Load the module
adb shell insmod /tmp/aosp_training_sysfs.ko

# Let's check if our module has actually been loaded. Pay attention to the usage numbers:
adb shell lsmod | grep training

# Let's see if our module is actually providing the expected information in sysfs:
adb shell cat /sys/kernel/aosp_training/read_me

# Unload the kernel module again
adb shell rmmod aosp_training_sysfs
Integrate kernel module into AOSP source tree
To include your kernel modules in the AOSP build for the cuttlefish device, we need to tell the build system about them. First, we want to copy the modules to the AOSP tree, to the vendor/inovex folder:
cd ~/android
mkdir -p vendor/inovex
cp ~/kernel-gki-android15-6.6/bazel-bin/vendor/inovex/kernel-module/training_mod/aosp_training*.ko vendor/inovex
In the next step, the build system needs to be told to include these modules. For the cuttlefish device, this is controlled by the device/google/cuttlefish/shared/BoardConfig.mk file. Here we can add our module to be included for cuttlefish.
Looking at the documentation by Google we see that a variable named BOARD_VENDOR_KERNEL_MODULES is used.
So at the end of device/google/cuttlefish/shared/BoardConfig.mk add:
BOARD_VENDOR_KERNEL_MODULES += \
    vendor/inovex/aosp_training_sysfs.ko
and run m. After building the system, restart the CVD. The modules should then be available and loaded automatically:
adb root

# Let's see if our modules are actually providing the expected information in sysfs:
adb shell cat /sys/kernel/aosp_training/read_me
B07a: Inspect the Package Manager
Inspect the output of the package manager for the installed packages. Use the following commands to answer some questions.
adb shell pm list packages
adb shell pm dump <package name> | less
Questions:
- Where is the apk of preinstalled packages stored?
- Where is the apk of your application that is installed later via adb install?
- What does the SYSTEM flag mean?
- How do you know which applications are privileged?
B07b: Inspect SELinux Actions During Runtime
SELinux error messages are rate-limited after boot complete to avoid swamping the logs.
To make sure you see all the relevant messages you can disable this by running:
adb shell auditctl -r 0
https://source.android.com/docs/security/features/selinux/validate
logcat | grep avc

adb shell su root dmesg | grep 'avc: '
Info
AVC stands for Access Vector Cache in SELinux context. It contains cached decisions to increase performance by not re-evaluating the policy rules for every call.
Note
If the output of the above command is empty, restart your device. When your device runs without activity for a long time, there are no SELinux errors.
# Switch adb to root powers
adb root

# Switch to permissive mode
adb shell setenforce 0

# Get current mode
adb shell getenforce

# Use audit2allow
adb pull /sys/fs/selinux/policy
adb logcat -b events -d | audit2allow -p policy

# To use audit2allow you may have to install it first:
apt install policycoreutils-python-utils
SELinux and Native Service
In case you attempted the optional step 5 of the native service exercise, you may have encountered this error message:
Control message: Could not ctl.start for 'demo_service' from pid: 2592 (start demo_service): File /system/bin/demo(labeled "u:object_r:system_file:s0") has incorrect label or no domain transition from u:r:init:s0 to another SELinux domain defined. Have you configured your service correctly? https://source.android.com/security/selinux/device-policy#label_new_services_and_address_denials. Note: this error shows up even in permissive mode in order to make auditing denials possible.
As the error message suggests, setenforce 0 will not save us here. So let's add some rules to allow the service to run with SELinux in enforcing mode. Add or alter the following files in this directory: device/google/cuttlefish/shared/sepolicy/system_ext/private
demo.te contains the rules for our service:
type demo_service_server, domain;
type demo_service_server_exec, system_file_type, exec_type, file_type;

# Service on system partition:
typeattribute demo_service_server coredomain;

init_daemon_domain(demo_service_server)

# Allow it to add itself as the system service:
add_service(demo_service_server, demo_service);

# Register the system service with the service manager:
type demo_service, app_api_service, ephemeral_app_api_service, service_manager_type;

# Allow it to be a binder service:
binder_use(demo_service_server)
binder_service(demo_service_server)
file_contexts tells SELinux which context the executable we install for our service belongs to. Add the following line to the already existing file:
/system_ext/bin/demo u:object_r:demo_service_server_exec:s0
And service_contexts maps the service name our demo service provides to a context. Add the following line to the already existing file:
demoservice u:object_r:demo_service:s0
If you have not added it previously in the optional Step 5 of the native service exercise, also add the line PRODUCT_PACKAGES += demo demo-client.
If you have not attempted Step 5, here is a demo.rc init file for our service:
service demo_service /system_ext/bin/demo
     interface aidl demoservice
     class main
     user root
And to include it in the build, add the line init_rc: [ "demo.rc" ], in the cc_binary section for the demo executable in Android.bp
Then rebuild the system images and reboot. The demo service should now be started automatically and you can use demo-client hello without having to start it manually.
B08a: Inspect VHAL
Where's the VHAL?
Try to find it with lshal:
adb shell lshal

# Commonly found command isn't working?!
adb shell lshal debug android.hardware.automotive.vehicle@2.0::IVehicle
Small note in the docs: The above command is for HIDL VHAL.
Let's try the AIDL service version:
adb shell \
    dumpsys android.hardware.automotive.vehicle.IVehicle/default
    [--help]
    [--get <PROP_ID>]
    […]
Works!
Using the HAL service
To see all options, use
adb shell dumpsys android.hardware.automotive.vehicle.IVehicle/default --help
Let's check some common property values, like the VIN. The property ID of the VIN can be found in the file: hardware/interfaces/automotive/vehicle/aidl_property/android/hardware/automotive/vehicle/VehicleProperty.aidl
To dump a single property, use
adb shell dumpsys android.hardware.automotive.vehicle.IVehicle/default --get <id>
and replace <id> with the property id.
Is there an easier way to find out property ids?
Also try to set a property. Read the output of --help to find out the argument syntax.
Using the car_service
The car_service offers lots of commands that also can be invoked through dumpsys. You can get a list of commands via:
adb shell dumpsys car_service help
For instance, to get the same VIN information as in the previous step, you could also use:
adb shell dumpsys car_service get-property-value INFO_VIN
To see a full list of outputs use
adb shell dumpsys car_service
Check how you can interact with it using dumpsys!
B08b: Try Monitor App
In this example you try out the User Switch Monitor App described in the AAOS slides.
Install
First build the application
m -j24 UserSwitchMonitorApp
Then see the output on the console. It's built and put into the directory
out/target/product/vsoc_x86_64_only/system/priv-app/UserSwitchMonitorApp/UserSwitchMonitorApp.apk
Install the application and grant the necessary runtime permission:
adb install --user 0 $OUT/system/priv-app/UserSwitchMonitorApp/UserSwitchMonitorApp.apk
adb shell pm grant --user 0 com.google.android.car.userswitchmonitor android.permission.INTERACT_ACROSS_USERS
Run
Start the (foreground) service
adb shell am start-foreground-service --user 0 com.google.android.car.userswitchmonitor/.UserSwitchMonitorService
Now the app is running and the service within the application has started. See the tag mentioned in the logcat output
adb logcat -s UserSwitchMonitor
Also, see the dumpsys output of the service.
adb shell dumpsys activity service com.google.android.car.userswitchmonitor/.UserSwitchMonitorService
Try it Out
Next, try a user switch in the running Android system. In the top right corner you can switch between the Driver and the Guest user.
Do this now and re-execute the logcat and dumpsys commands. You should see additional log messages and events.
Extra Tasks
Locate the source code of the application in the source tree. E.g., the function that prints the output seen in the dumpsys command. Use both: cs.android.com and the local source tree.
Tip
Use a string that is printed on the console as a search term.
Also, try to use the mgrep and godir commands in the AOSP build environment.
Also, locate the AndroidManifest.xml and review the (foreground) service definition used for am start-foreground-service.
And question: What is the difference between the folder /system/priv-app and /system/app/ in the system partition?
Note
If you write your own native or (foreground) service, add a dumpsys debug interface. It's super useful to query the internal state of our service on the command line adb.
B08c: Exercise: Use Vehicle Properties
In this exercise you are going to access vehicle properties from an Android application.
In case you have not done so already, clone the example repository to your local machine:
git clone https://github.com/inovexAcademy/aosp-aaos-training
In the folder app-automotive/, an Android example application is prepared.
Attach Android Studio to Cuttlefish
In the previous exercise you've built and copied the apk to the virtual machine and installed the application by hand on the command line. To speed up your development cycle, you can attach Android Studio to the cuttlefish device via adb over an additional ssh forward.
To do so, open the ssh configuration file and add/edit the following line
LocalForward 5038 localhost:5037 # for adb
Note
Please take attention to the different port numbers. The remote port 5037 is forwarded to the local port 5038.
Then restart your ssh connection to the cloud instance.
Now reconfigure Android Studio:
- Click on File -> Settings
- Search for adb
- In Adb Server lifecylce management enable Use existing manually managed server and use the port 5038.
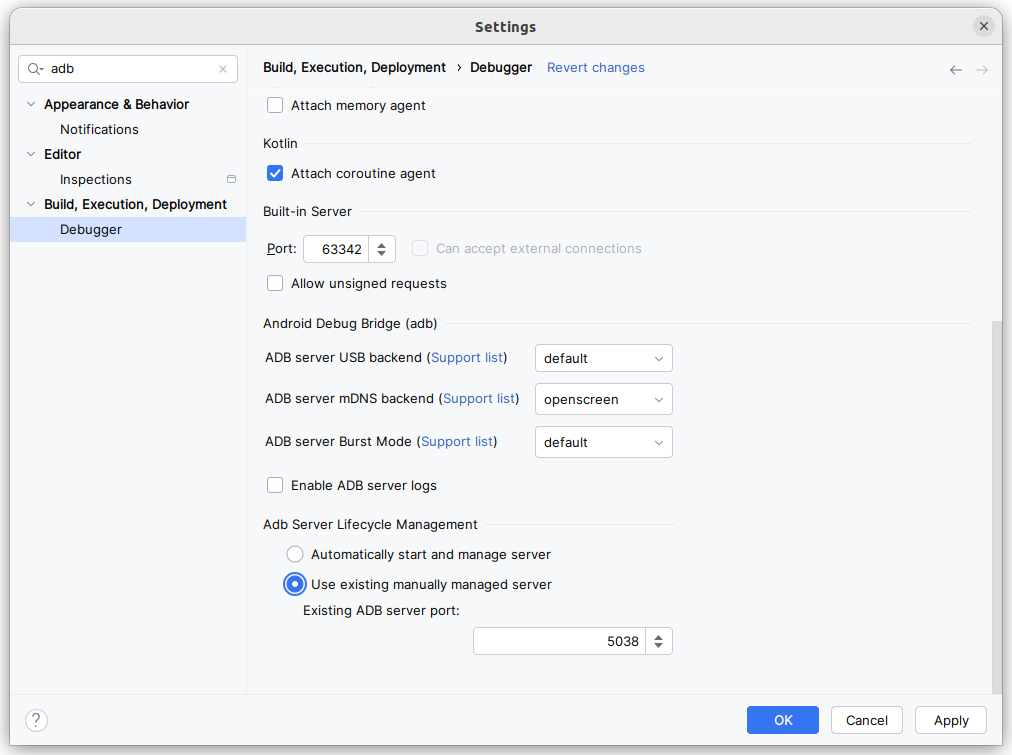
Note
When using forwarded ADB ports, sometimes installation of an App fails or hangs in Android Studio and cannot be recovered without a restart of Android Studio.
ADB and the port forwarding usually still work correctly and Android Studio's logcat viewer is functional as well.
You could also use the forwarded ADB port manually in a Terminal (including the one built-in into Android Studio). Simply add the port argument to the adb commands you are already familiar with or set an environment variable:
# Either add -P 5038 to all adb calls, for instance:
adb -P 5038 install myapp.apk

# or set the environment variable and skipp the port argument:
export ANDROID_ADB_SERVER_PORT=5038
adb install myapp.apk
Preface
The Automotive APIs of Android are not part of core Android APIs for applications. They are located in additional libraries.
When developing a production-ready Android Application, you will be using the Car API provided by Android Jetpack. See Car App.
Info
Previously these libraries were also called Android Support Libraries. Nowadays they are called Jetpack and the Java methods and classes reside in the androidx namespace.
Android App developers use these libraries to abstract over different versions of Android.
In this exercise you use the Car API that is exposed in the Android SDK directly. On the page developer.android.com: android.car your find the API reference.
How do the Jetpack library and the Car API relate?
For example the two Java classes
do roughly the same thing. They can connect to the service on the device and return the CarManagers/CarServices. And the CarContext Java class is using the Car API internally.
Build the Application
Open the application in the folder app-automotive/ with Android Studio.
Take a look at the app-automotive/app/build.gradle.kts. That file contains the line
useLibrary("android.car")
This means that the uses-library XML tag is added to the Android Manifest file. When the application starts on the device, the Car Java library is loaded into the application and the Car API is available.
Navigate into the file MainActivity.java and look for the function setupUI(). Here you should add your code.
First let the instructor show you the basics of the code setup.
Use Our First Vehicle Property
In this section you should add the necessary code to query the vehicle property INFO_MODEL.
Every vehicle property is protected by an Android permission. Search in AOSP sources in the folders
- packages/services/Car/ and
- hardware/interfaces/automotive/
and find out which permission is needed.
Add this permission in a uses-permission XML tag to the AndroidManifest.xml. An example code line:
<uses-permission android:name="<permission name>" />

<application [...]
Furthermore, every vehicle property has an area type. Search the two directories again and find out what the correct area type is.
Then find out the type of the property. E.g., whether it's an integer, float or string.
After that use the CarPropertyManager to retrieve the value of the property and set it in the TextView.
Code template for setupUI():
variable = [Add the code for the CarPropertyManager here]
textViewModel.setText("Model: " + <variable>);
Rebuild and rerun the application and see the results.
Debugging tips:
- Use logcat -c to clear the log cat buffer. This avoids seeing older and unrelated log messages from a previous instance of your application.
- Use alogview to only see the logcat buffer of your application.
Changing the Vehicle Property
The previous chapter already mentioned that you can query and set vehicle properties in the car service and in the VHAL.
adb shell dumpsys android.hardware.automotive.vehicle.IVehicle/default --set 0x11100102 -s new-model
If you see the error
Error with service 'android.hardware.automotive.vehicle.IVehicle/default' while dumping: FAILED_TRANSACTION
execute adb root to restart the adb daemon on the device with root privileges.
Note
using adb root only works in userdebug and eng build variants.
After that you should be able to set the property successfully.
You can query the value of the property that is saved in the VHAL with
adb shell dumpsys android.hardware.automotive.vehicle.IVehicle/default --get 0x11100102
The INFO_MODEL vehicle property is a static property. Therefore, the car services does not get notified when this property is changed in the VHAL. The car service even implements a caching layer for the static properties. See the file and code packages/services/Car/service/src/com/android/car/hal/PropertyHalService.java.
To see the new value of INFO_MODEL in the application, you have to restart the car sevice. Use
adb shell pkill com.android.car
Since the application has implemented the onLifecycleChanged() listener, the application will auto reconnect to the car service. If you start logcat with adb shell logcat -s MainActivity:*, you will see the following output
I MainActivity: onLifecycleChanged: ready=false
I MainActivity: onLifecycleChanged: ready=true
D MainActivity: model=new-model
D MainActivity: currentGear=4
D MainActivity: onChangeEvent: gear=4
Also look at the Activity of your application. It also shows the new model string now.
Changing a Non-Static Vehicle Property
In the previous chapter a static vehicle property was used. Now add the dynamic property CURRENT_GEAR to the application.
Again search for the permission, the area type and the type of the value.
Since the property is non-static, use CarPropertyManager to register a callback that listens for events with property changes.
Note
There are three different "categories" of functions that allow registering callbacks. Some are complicated and use lists of property requests, some are deprecated. Stick to the most simple variant.
There are multiple ways to implement the solution. You could either follow the pattern already present in the implementation or use a more idiomatic approach. If you're stuck, don't hesitate to ask for help.
Remember, that updating the view should happen on the UI thread. You may use the following line in your callback code:
runOnUiThread(() -> textViewGear.setText("Gear: " + <variable>));
To inject a new value for the property, use the following command
adb shell dumpsys car_service inject-vhal-event 0x11400401 0 0x10
adb shell dumpsys car_service inject-vhal-event 0x11400401 0 0x20
adb shell dumpsys car_service inject-vhal-event 0x11400401 0 0x40
You should observe how the value on the screen is changing while the app is running.
Further reading
On the page Vehicle hardware abstraction layer you can read more about the hardware abstraction layer.
B10: Exercise: Create your own product
In this exercise you will create your own product and lunch target.
Add product
Create a new device tree directory
mkdir -p device/mycompany
cd device/mycompany
In this directory create a AndroidProducts.mk file with the content
PRODUCT_MAKEFILES := \
    aosp_my_x86_64:$(LOCAL_DIR)/aosp_my_x86_64.mk

COMMON_LUNCH_CHOICES := \
    aosp_my_x86_64-trunk_staging-userdebug
Create a aosp_my_x86_64.mk file with the content
# Base this product on "aosp_cf_x86_64_auto"
$(call inherit-product, device/google/cuttlefish/vsoc_x86_64_only/auto/aosp_cf.mk)

PRODUCT_MANUFACTURER := MyCompany
PRODUCT_NAME := aosp_my_x86_64
PRODUCT_MODEL := My Device Model
# This must match a existing BoardConfig.mk within the boards/$(PRODUCT_DEVICE) subfolder.
PRODUCT_DEVICE := my_aosp_auto
Create a BoardConfig.mk within the board\my_aosp_auto subfolder, with the content:
-include device/google/cuttlefish/vsoc_x86_64_only/BoardConfig.mk
Now you can already build your new product.
Execute lunch. Your new device should appear.
Select and build it with:
lunch aosp_my_x86_64-trunk_staging-userdebug
m -j24
After building it, run the cuttlefish emulator again.
Check that your new product is running with
adb shell getprop | grep model
adb shell getprop | grep aosp_my
Check also the Settings application. Under System -> About your Model name should appear.
Add a system property
To add a custom system property to our product, add the following code to your product makefile called aosp_my_x86_64.mk:
PRODUCT_PRODUCT_PROPERTIES += \
     ro.mycompany.test=hello
Rebuild, rerun and test with
adb shell getprop ro.mycompany.test
Add a prebuilt application
In the directory device/mycompany/, next to aosp_my_x86_64.mk, file create a file called Android.bp with the content
android_app_import {
    name: "MyApp",
    presigned: true,
    preprocessed: true,
    apk: "app-debug.apk",
}
Upload the app-debug.apk into the same directory.
Info
The Soong API reference can be found here.
Be aware that this is for a specific Soong release. If you need the reference for your local AOSP build, checkout the Soong README file that is usually found in the build/soong folder of the AOSP tree.
Add the following code to your product makefile called aosp_my_x86_64.mk:
PRODUCT_PACKAGES += \
    MyApp
Rebuild, rerun and test with
adb shell find /system -name MyApp.apk
adb shell pm dump de.inovex.aosptraining | less
The SYSTEM flag should be set now and the apk location on the system partition.
M: Media/Graphics Exercises
This page contains subpchages for the graphics exercises.
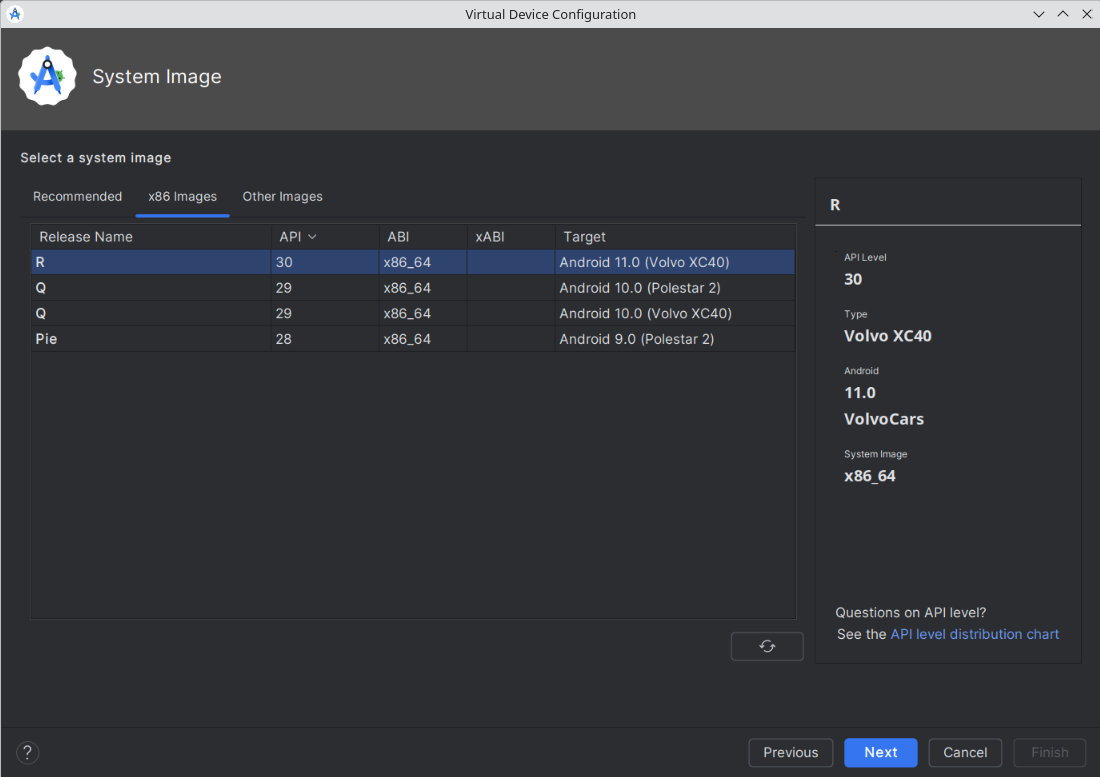
Using perfetto
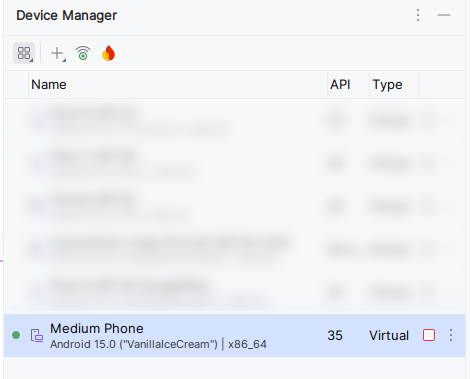
Create a virtual device in Android Studio. In this training you should use a Medium Phone with a x86_64 image and API level 35. See the image
Clone the example repository:
git clone https://github.com/inovexAcademy/aosp-aaos-training
Open the Android Application in the subfolder app-graphics in Android Studio.
Start the virtual device and build and deploy the SimpleUIUpdateActivity to the device.
Open https://ui.perfetto.dev/.
- For Linux use ADB + Websocket proxy.
- For Windows see the instructions at the end of the page.
Select the following trace sources
- CPU -> Scheduling Details
- Android apps & svcs -> Atrace userspace annotations (select all and Record events from all Android apps and Services)
- Android apps & svcs -> Frame timeline
- Advanced Settings -> Advanced ftrace config
- Advanced Settings -> Process<>thread association
Then trace for a few seconds.
Inspect the results for the example application.
See
- the different lanes for the different threads
- the thread states (running, runnable, sleeping)
- the existing atrace tags
- the search bar on top
- a binder flow event
- the pin feature
Now enable the two predefined atrace tags in the SimpleUIUpdateActivity of the example application. Rebuild and rerun the application and trace again. You should see the new atrace tags in the trace.
Special Instructions for Windows
ADB + Websocket does not support Windows and the emulator is not connected via USB to your computer (like a normal phone). So the option WebUSB also does not work. Instead you must start perfetto manually with the following instructions:
Select the perfetto tracing options as described above.
Go to Cmdline instructions in the Perfetto UI.
Copy the configuration named config.pbtx.
Go into the platform-tools directory that contains the adb program.
Create a file called perfetto.txt there. Paste the configuration content into it and save the file.
Now start a shell window. It can be the traditional cmd or a Windows PowerShell.
Change directory into the platform-tools directory.
Execute the command was shown into Perfetto UI, but adapt it to Windows. Example:
type perfetto.txt | .\adb shell perfetto -c - --txt \
    -o /data/misc/perfetto-traces/trace.pftrace
After tracing has finished, copy the trace results to your computer using adb pull. Example:
.\adb pull /data/misc/perfetto-traces/trace.pftrace
Now open the file trace.pftrace in the Perfetto UI.
Finding APIs
In this exercise three groups should find and talk (a bit) about Android APIs for media.
Split in three groups and search for
- Group 1: Audio APIs
- Group 2: Video APIs
- Group 3: DRM (Digital Rights Management)
- Group 4: Camera APIs
and make a summary of interesting findings and notes.
Use the Android Documentation for Developers and your favorite search engine.
Appendix - Working with emulators
Install a custom car emulator. See Add system images from OEMs on developer.android.com:
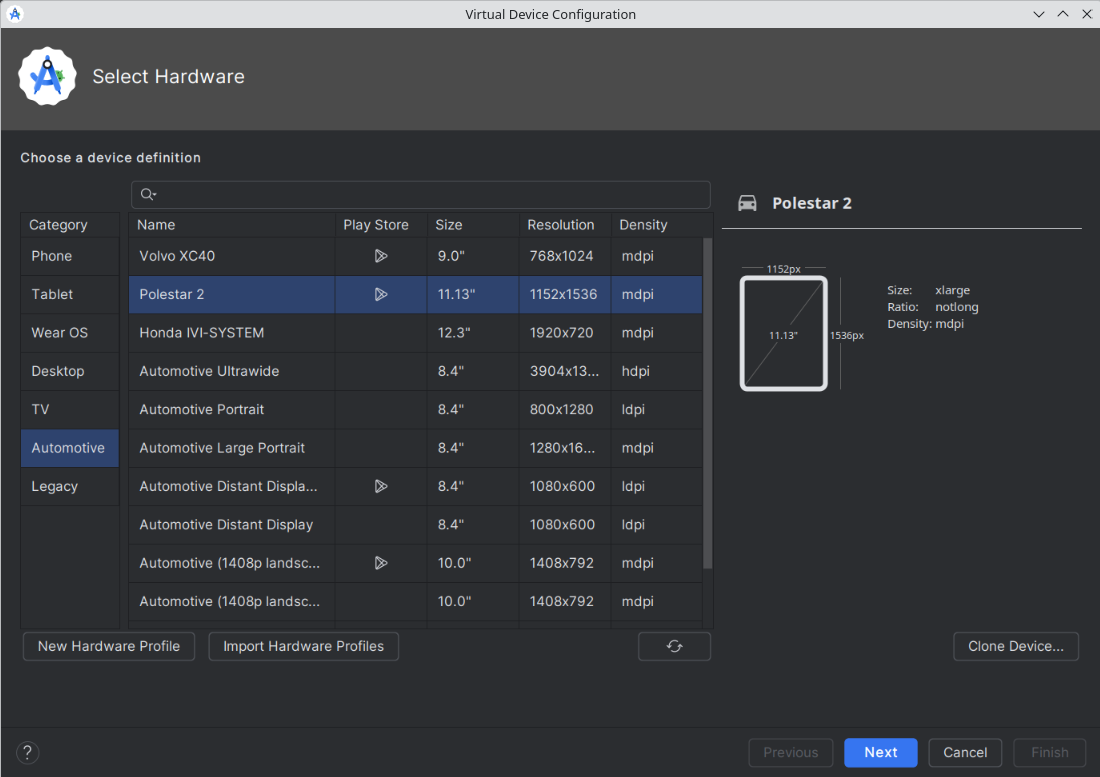
QT_QPA_PLATFORM='wayland;xcb' emulator -list-avds

QT_QPA_PLATFORM='wayland;xcb' emulator @Honda_IVI-SYSTEM_API_30