B08c: Exercise: Use Vehicle Properties
In this exercise you are going to access vehicle properties from an Android application.
In case you have not done so already, clone the example repository to your local machine:
git clone https://github.com/inovexAcademy/aosp-aaos-training
In the folder app-automotive/, an Android example application is prepared.
Attach Android Studio to Cuttlefish
In the previous exercise you've built and copied the apk to the virtual machine and installed the application by hand on the command line. To speed up your development cycle, you can attach Android Studio to the cuttlefish device via adb over an additional ssh forward.
To do so, open the ssh configuration file and add/edit the following line
LocalForward 5038 localhost:5037 # for adb
Note
Please take attention to the different port numbers. The remote port 5037 is forwarded to the local port 5038.
Then restart your ssh connection to the cloud instance.
Now reconfigure Android Studio:
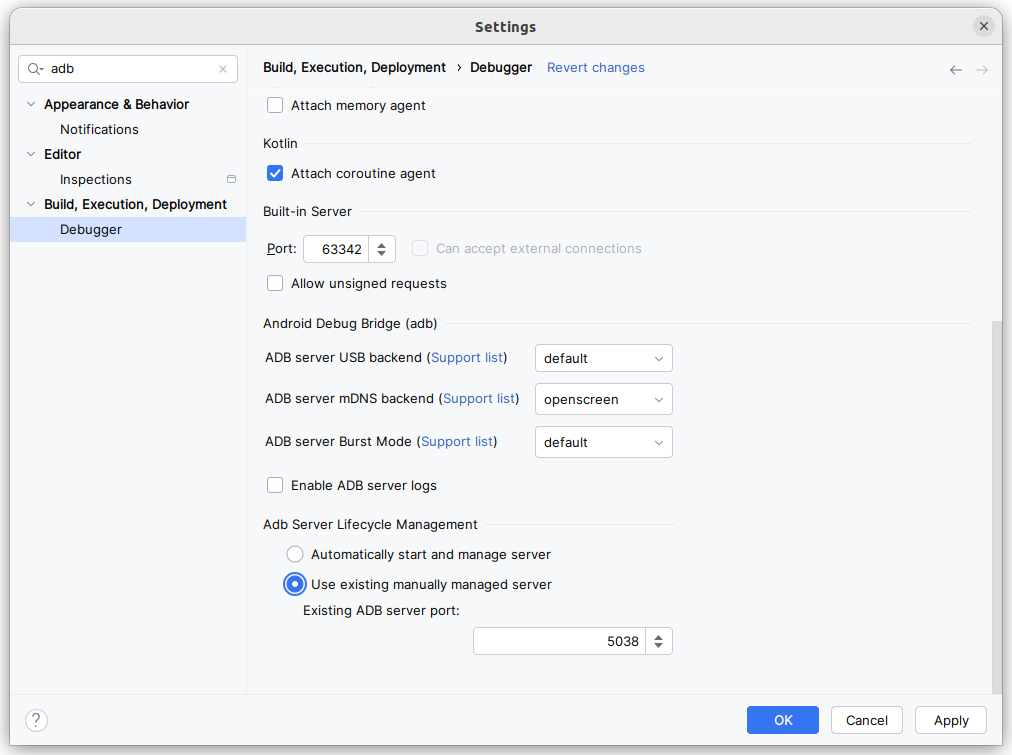
- Click on File -> Settings
- Search for adb
- In Adb Server lifecylce management enable Use existing manually managed server and use the port 5038.
Note
When using forwarded ADB ports, sometimes installation of an App fails or hangs in Android Studio and cannot be recovered without a restart of Android Studio.
ADB and the port forwarding usually still work correctly and Android Studio's logcat viewer is functional as well.
You could also use the forwarded ADB port manually in a Terminal (including the one built-in into Android Studio). Simply add the port argument to the adb commands you are already familiar with or set an environment variable:
# Either add -P 5038 to all adb calls, for instance:
adb -P 5038 install myapp.apk

# or set the environment variable and skipp the port argument:
export ANDROID_ADB_SERVER_PORT=5038
adb install myapp.apk
Preface
The Automotive APIs of Android are not part of core Android APIs for applications. They are located in additional libraries.
When developing a production-ready Android Application, you will be using the Car API provided by Android Jetpack. See Car App.
Info
Previously these libraries were also called Android Support Libraries. Nowadays they are called Jetpack and the Java methods and classes reside in the androidx namespace.
Android App developers use these libraries to abstract over different versions of Android.
In this exercise you use the Car API that is exposed in the Android SDK directly. On the page developer.android.com: android.car your find the API reference.
How do the Jetpack library and the Car API relate?
For example the two Java classes
do roughly the same thing. They can connect to the service on the device and return the CarManagers/CarServices. And the CarContext Java class is using the Car API internally.
Build the Application
Open the application in the folder app-automotive/ with Android Studio.
Take a look at the app-automotive/app/build.gradle.kts. That file contains the line
useLibrary("android.car")
This means that the uses-library XML tag is added to the Android Manifest file. When the application starts on the device, the Car Java library is loaded into the application and the Car API is available.
Navigate into the file MainActivity.java and look for the function setupUI(). Here you should add your code.
First let the instructor show you the basics of the code setup.
Use Our First Vehicle Property
In this section you should add the necessary code to query the vehicle property INFO_MODEL.
Every vehicle property is protected by an Android permission. Search in AOSP sources in the folders
- packages/services/Car/ and
- hardware/interfaces/automotive/
and find out which permission is needed.
Add this permission in a uses-permission XML tag to the AndroidManifest.xml. An example code line:
<uses-permission android:name="<permission name>" />

<application [...]
Furthermore, every vehicle property has an area type. Search the two directories again and find out what the correct area type is.
Then find out the type of the property. E.g., whether it's an integer, float or string.
After that use the CarPropertyManager to retrieve the value of the property and set it in the TextView.
Code template for setupUI():
variable = [Add the code for the CarPropertyManager here]
textViewModel.setText("Model: " + <variable>);
Rebuild and rerun the application and see the results.
Debugging tips:
- Use logcat -c to clear the log cat buffer. This avoids seeing older and unrelated log messages from a previous instance of your application.
- Use alogview to only see the logcat buffer of your application.
Changing the Vehicle Property
The previous chapter already mentioned that you can query and set vehicle properties in the car service and in the VHAL.
adb shell dumpsys android.hardware.automotive.vehicle.IVehicle/default --set 0x11100102 -s new-model
If you see the error
Error with service 'android.hardware.automotive.vehicle.IVehicle/default' while dumping: FAILED_TRANSACTION
execute adb root to restart the adb daemon on the device with root privileges.
Note
using adb root only works in userdebug and eng build variants.
After that you should be able to set the property successfully.
You can query the value of the property that is saved in the VHAL with
adb shell dumpsys android.hardware.automotive.vehicle.IVehicle/default --get 0x11100102
The INFO_MODEL vehicle property is a static property. Therefore, the car services does not get notified when this property is changed in the VHAL. The car service even implements a caching layer for the static properties. See the file and code packages/services/Car/service/src/com/android/car/hal/PropertyHalService.java.
To see the new value of INFO_MODEL in the application, you have to restart the car sevice. Use
adb shell pkill com.android.car
Since the application has implemented the onLifecycleChanged() listener, the application will auto reconnect to the car service. If you start logcat with adb shell logcat -s MainActivity:*, you will see the following output
I MainActivity: onLifecycleChanged: ready=false
I MainActivity: onLifecycleChanged: ready=true
D MainActivity: model=new-model
D MainActivity: currentGear=4
D MainActivity: onChangeEvent: gear=4
Also look at the Activity of your application. It also shows the new model string now.
Changing a Non-Static Vehicle Property
In the previous chapter a static vehicle property was used. Now add the dynamic property CURRENT_GEAR to the application.
Again search for the permission, the area type and the type of the value.
Since the property is non-static, use CarPropertyManager to register a callback that listens for events with property changes.
Note
There are three different "categories" of functions that allow registering callbacks. Some are complicated and use lists of property requests, some are deprecated. Stick to the most simple variant.
There are multiple ways to implement the solution. You could either follow the pattern already present in the implementation or use a more idiomatic approach. If you're stuck, don't hesitate to ask for help.
Remember, that updating the view should happen on the UI thread. You may use the following line in your callback code:
runOnUiThread(() -> textViewGear.setText("Gear: " + <variable>));
To inject a new value for the property, use the following command
adb shell dumpsys car_service inject-vhal-event 0x11400401 0 0x10
adb shell dumpsys car_service inject-vhal-event 0x11400401 0 0x20
adb shell dumpsys car_service inject-vhal-event 0x11400401 0 0x40
You should observe how the value on the screen is changing while the app is running.
Further reading
On the page Vehicle hardware abstraction layer you can read more about the hardware abstraction layer.